DIY Microphone Isolation Shield – An Easy Guide To DIY Mic Shield
We all know, how costly music gears have become these days. Being on a budget and also in a need to buy Essential things for your home studio for recording purposes, it becomes difficult to purchase them all. In such a case, you can use DIY Microphone Isolation Shield(DIY Mic Shield). It is going to help you save some bucks that you can use somewhere else in your gear.
Here, at midisic, we try to provide information to young and aspiring people from the music field. Let them be musicians, music producers, singers, songwriters, and or any person. So let’s start with what we are going to learn today in this blog where you’ll learn the process to make your own DIY microphone pop filter also known as DIY Microphone pop filter.

introduction
Buying all those costly music production or recording gears, hardly leaves anyone with the pocket that has the tendency to pay for the Microphone Isolation Shield. Although you can go for the cheap options, they aren’t available as a fully enclosed isolation booth.
Also, the Microphone Shield that you look to buy, could be too big for you to place in your room. And that leaves us to the idea of creating our own DIY Microphone Isolation Shield(DIY Mic Shield). Creating your own DIY Vocal Booth will cut you the extra high cost and will also provide you with a good quality voice recording.
In this blog, you are going to learn the full process step by step on how you can create your own DIY Microphone Isolation Shield(DIY Mic Shield) and that also with the minimum cost. All you are needed to do is just read the full blog, and get the things with you that are necessary mean in order to make a DIY Microphone Isolation Shield(DIY Mic Shield).
Now with this Mic Vocal Booth, no matter if you record your voice or your instrument, you are going to get a lot more quality than that without any Mic Isolation Shield. We made this informative blog with a lot of research and by creating our own Microphone Isolation Shield. So let’s see how a DIY Microphone Isolation Shield(DIY Mic Shield) is done.
Quick Microphone Isolation Shield Buy Link
There are many people who don’t have enough time due to their daily chores. So I’m here for you to present our Top 3 of my Microphone Isolation Shield Recommendations that you can look up to. These are our top pics. You can directly go for them as they are the best in the range and provide the best value for money.
1. Aokeo Studio Recording Microphone Isolation Shield – (Our Best Choice)
2. TONOR Microphone Isolation ShieldG P120 – (Our Second Best Choice)
3. AGPTEK Microphone Isolation Shield – (Cheapest and the Best)
What does a microphone isolation shield do?
I understand, when a new beginner looks upon the things that are needed to record a song, and they find this Mic Isolation Shield. The first question that comes to their mind is what does a microphone isolation shield do and why is it so necessary to be in the present while recording sound.
So let me answer this for you guys, what is the work of a Mic isolation shield. The DIY Microphone Isolation Shield acts as a filter that helps to minimize the unwanted noise coming from the background.
When you record either your vocals or your instruments, without the mic shield, there lies the echo in any room. Using The Best condenser microphone for recording can result in capturing a large amount of background sound. This is because the condenser microphones have the ability to grasp more sound frequency than other Types of Microphones.
And that will make your sound cause problem while mixing in the future. Using the Microphone Shield, helps you to reflect the sound waves and create a balance in the recording of your vocal. When you isolate your microphone from the surroundings and prevent it from capturing the echoes, you get an enhanced recording and awesome effects.
Do Mic Isolation Shields Work?
Today, in order to break the music records, the audio quality of your song should be at the top. Ans in rider to get that top-notch quality audio, the recording shield must be of the quality. That’s why the isolation shield is indeed one of the most important tools that help you increase the quality of your audio.
Well, you can go for the expensive isolation shields sold in the market, or you can opt for an alternative – a DIY microphone isolation shield. But, there comes one inevitable question to the mind. Does Mic Isolation Shield work?
Undesired background noise, sound wave reflection, and ambiance, everything gets reduced while using the DIY isolation shield while recording the audio. The shield isolates the microphone from the surrounding area.
In order to get a more clear recording, both soundproofing and acoustic treatment will help you a lot. A DIY microphone isolation shield, on the other hand, will minimize external sounds and resonance within the room. This takes your recording environment to the next level.
So yes, a DIY microphone isolation shield really does work and helps you to increase the quality of your sound.
How do you make a DIY microphone isolation shield?
Okay, So we’ve come to the point where we start making the DIY Microphone Isolation Shield. In order to make a mic shield, there are many things that you need to keep in mind while preparing the DIY Mic shield.
Simply just follow the steps and you will be ready with your own mic shield in no time. Let’s start with the material required for the same.
Materials
The first thing that we need to keep in mind is the materials that are needed to make a fully functional DIY Microphone Isolation Shield. Below are the list of them and the quality that you’ll be needed to know along.
1. A square/Rectangle box
The first and the most important thing that we need in order to complete our Microphone Isolation Shield is a box. The box can be of either shape – Square or Rectangle.
According to your suitability, or room availability, you can choose the shape of the box. Although make sure that the material you select should be a little hard. It should bend over once placed on the ground.
The box is for the support and a room like, so it should be rigid. The material for the box you shall use here could be hard plastic, fiber, or cardboard. If you choose a hard plastic, you’ll be needed to keep extra attention on covering the echoic part with either foam or any cloth.
But if you choose the cardboard for the box preparation, the surface itself will work positively in order to absorb the sound. So I would suggest you go with cardboard, as they are also cheap to buy. And you can easily get them in your nearby stationary shop.
OR
You can also get any big size Carton Box if you have one in your room. They are quite handy and will require less time to modify into a DIY Microphone Isolation Shield.
2. A Bunch of sound proof foam

Finding a bunch of Sound Foams in order to make a DIY Microphone Isolation Shield, is extremely simple. You can visit any music store where they sell all types of instruments and music gear, and ask them for soundproof foam.
Or you can also Buy on Amazon. I’ve picked up a very cheap and quality soundproof foam for you.
Get the 2 pack of 12″x 12″ foam that have ridges at the downside. The ridges below help to absorb more sound than the plain ones. And our aim here is to make the isolation shield that provides a soundproof room.
3. Scissor

A scissor is what you need next in the list of DIY Microphone Isolation Shield. Make sure the scissor you chose, is sharp because it’ll be used to cut the cardboard(if you are making the wall of the shield with the cardboard).
4. A hot glue gun/glue

Next, you’ll be needed something to stick up your borders and foam to the walls. You can prefer the options Hot Glue Gun or a glue that has the ability to give a perfect stick.
The options are truly on you, both will work just fine. So if any of them you think is easy to find, pick that up.
How do you make a microphone isolation shield
Now we’ve come to the procedure on how to make a vocal booth at home. With these simple steps, you can make an effective mic shield at your home and can use it to record quality audio at a very cheap price.
Step 1:
The first thing you need to do is if you have chosen any Carton Box, take the scissor, and cut the upper lid part of the box. It should be done in such a way that one side of the box should be completely open.

If you went for the cardboard option, just place and stick every side with equal-sized cardboard and construct it like it’s shown in the image. Cut the extra part with the scissor and make sure that every side of the wall is of the same size.

But, if you already have a plastic or a fiber box that’s large enough in which you can place your microphone, the first step you have to do there is cover the upper part of the box with the velvet paper that you can buy from the stationary.
Use a hot glue gun or any strong glue to stick the same. Make sure the glue you put is strong enough to hold the paper and gets stuck on the surface nicely.
step 2:
Now the next step that comes here will be the same for every people. Those who have cardboard, a carton box, or a plastic box. You have to do the same procedure with every box.
Start applying the soundproof foam in your DIY Vocal booth. Start from one side and continue in a line. Do not forget any empty space to create the echo there. Keep extra attention to the corner of the box. To make sure in the corners, you can cut 6 pieces of long foam like a stick. And stick them first to the corners.
Use scissors to cut them with safety and glue to stick the foam tightly. Make sure the glue is completely dry after sticking the foam. In order to do that, keep the box for some time under the fan.
step 3:
This is the final step in the process of making your own studio vocal booth. And is also optional. So you can follow this step if you want this option or you can just leave it.
So the step is to just cut a circle shape from the side to which your mic wire comes through. The whole should not be that huge. Just make sure, that the wire can pass through that easily.
Once done with cutting the circle, you can do the finishing with the black paper or anything that looks good on the border.
Final step:
Now coming to the end step, you can put your microphone in the middle of the box in such a way, that it gets an equal sound frequency from every side. Remove the cable of the microphone from the hole you made so that it does not look messy.
We all know how much does cleanliness affects our minds as music producers. So having a wire placement without a mess will help in the recording process. Although the step is optional. You can take the cable from the front opening too.
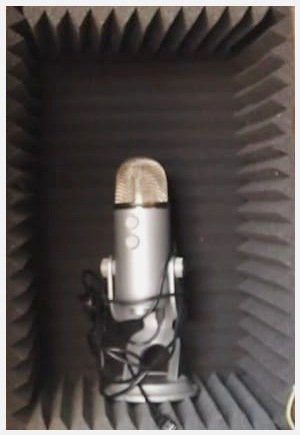
You are now ready with your own DIY Microphone Isolation Shield. Use it on all of your voice or instruments recordings and can get a perfect echo-free and quality sound.
things to keep in mind before making own studio vocal booth
When you decide to make your Microphone Isolation Shield on a budget at your home, there are things that are needed to keep in mind or to consider before doing so.
- When you choose the soundproof foam, it should be a quality one and should absorb the sound. While purchasing from the shop, you can ask them directly for what purpose the foam is you’re buying. nd if you are buying them from Amazon, buy from this link.
- I would suggest to use hot glue gun instead of any glue for the purpose of sticking the foam and the velvet paper to the box. But if you are going with the glue, make sure it has the tendency to hold the surface tightly. So that in the future, the foam should not start hanging from anywhere.
- In the corner of the box, you need to give extra attention. Most of the sounds get reversed back from the corners. You need to do here is to make stick like 6 foam by cutting them with scissors. And stick them to the corners. This will help you a lot when you’ll apply the foams on the wall of the box later.
- If you go with the hole in the wall to pass the cable of your microphone, make sure that you cut the box and the foam before sticking them. Otherwise when you’ll
conclusion
In the final words. I would say that there will be many music producers or vocalists who have a home studio setup, may not use the Microphone isolation shield, but that is where they are wrong.
We get a lot of differences with and without using any DIY Microphone Isolation Shield. It’s just people who don’t use, do not understand the use and effect of the same.
If you’ll ask me, a proper acoustically treated room is extremely important in order to record high-quality sound. But due to monetary reasons or some others, you can go with a Microphone Isolation Booth or DIY Mic Booth.
faq
The main function of a microphone isolation shield is to prevent recording any unwanted or undesirable background noise. The foam on the wall of the shield acts as an absorber and absorbed extra echo that comes reflecting the walls of the room.
Recording vocals or instruments in any normal room, without any acoustic treatment, may not give you the quality results, but with few craftworks and spending extremely little, you will be able to create your own DIY Microphone Isolation Shield.
If you are a beginner and using a microphone to record podcasts, then you can go without the sound shield. But, if you are a vocalist or you record instruments, a microphone isolation shield is a must.
Using Sound shield for recording purpose helps a lot and produce quality sound. You can ask any vocalist, they will confirm the answer. So YES, Sound Shields are definitely worth it.
As I answered the above question about why a vocal booth is necessary for vocalists, let me tell you again. Yes, a vocal booth is a must for the vocalists and musicians who record the instruments.
You don’t want any problem in the mixing part of your track and want it to get mixed seamlessly that sound the best. So in order to get that result, you are needed to take care from the beginning itself.
Making a Vocal Booth at your home is extremely easy and cheap. When you go out in a shop or on any online store, you’ll be told a high price for the same.
But with the simple steps that are given in this blog, you will be ready with your own DIY Microphone Isolation Shield. So make sure to read the complete blog and enjoy making a homemade vocal booth.
If you take the weight of the whole DIY Microphone Isolation Shield, it will be around 2 to 4 kgs, So in order to keep it safe, you need to make sure that it gets enough support from the bottom.
Also during the recording sessions, there might be times when you hit it accidentally. And you need good support so that it should not fall down. I would suggest you use a table that’s almost double the bottom surface area of that microphone isolation shield.
Place the shield in the middle so that an equal amount of space is maintained on both sides. Also, keep in mind that there should be enough space in front of the shield. The material you can use for the purpose could be anything hard. I would suggest going for the wooden table as it is hard and durable.
 Over 250+ Pages of Mixing Guide