Compressor Ratio or say Audio Compressor Ratio could be a complex subject for beginners and for those who are coming across this word for the first time.
What is Compressor Ratio? – A complete guide to getting everything about the compressor ratio
There are many new and young music producers who face such problems. If you think you are the only one who doesn’t know anything about compression, well, you’re not. There are many who get confused about it.

In this blog, you are going to learn everything in detail about What is Compressor Ratio and the process of its working.
What is Compressor Ratio?
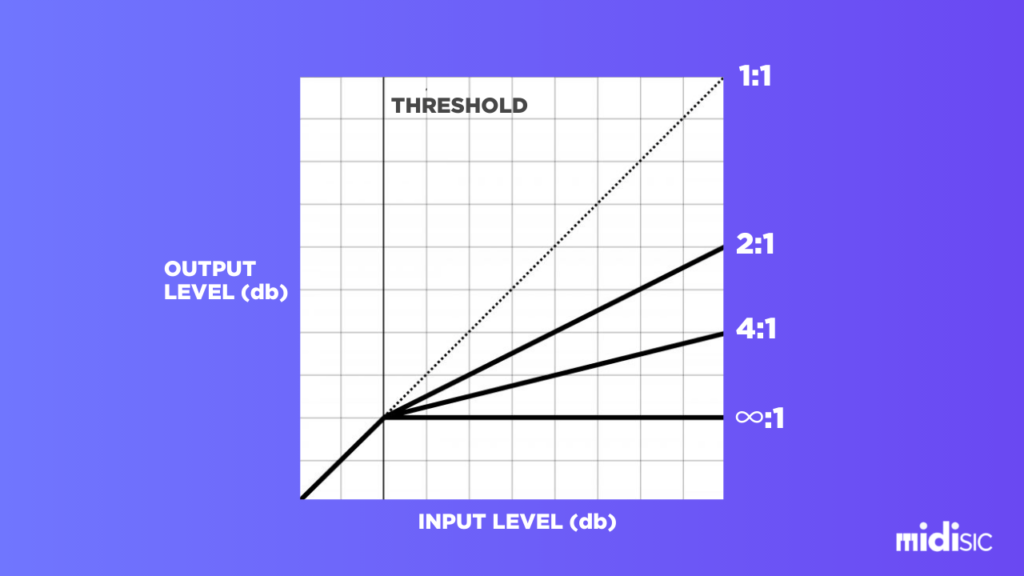
Compressor Ratio or Compression Ratio is a ratio of the volumes. The ratio knobs help in setting the quantity of applied compression. The numbers you see on the knob are the ratio of input as well as output. The compression and the compressor ratio, both are directly proportional.
The ratio ranges of the compressors are generally expressed in decibels (dB). If we take an example, with the compressor ratio of 2:1, the entered signal will cross the threshold by 2dB for the output level and extend by 1dB.
The above factor influences the gain reduction and also is a reason for you to choose exactly how much of a compression ratio you need. Compression Ratio varies, and there’s simple mathematics behind all this.
What does a Compressor Ratio do?
The audio compressor’s main job is to even out the volume level of an audio track. Think of how a singer performs a song. Sometimes they can sing really loud and sometimes really soft, but when you mix the singer’s song with other instruments in the band, it can be very difficult to hear the louder parts and soft parts equally.
Now if you turn the volume up to hear the soft parts then the loud parts will be too loud and if you turn the volume down you won’t hear the soft parts. If you’ve ever been to a concert and had trouble hearing the singer, this is where a good compressor can really save the day. A compressor will take the loudest parts of the audio signal and lower them in a very pleasing way.
It doesn’t lower the entire signal, It’s adjusted in a way that only lowers the parts of the signal that is too loud and you decide what too loud is by setting the threshold. And anything below the threshold stays unprocessed whereas anything above the threshold will be compressed. And again you get to decide how much you want to compress this loud part by adjusting something called the ratio.
Compressor Ratio Basics
First of all, let me tell you one thing – ‘Every sound and compressor is different. And it would be totally misleading to give or tell you a specific ratio setting that will work with any of your sounds.
The other factors such as audio source, the compressor’s other control settings could help you achieve the result that you are aiming for. So you need to keep on experimenting with the settings and play with the knobs. After some time it’ll become easy to understand the perfect range for your sound.
As there is no perfect formula, I would suggest you the best method to get the perfect Audio Compressor Ratio. And that is – Use Your Ears. In order to determine the right ratio for your sound, using the ears and meters are the easiest and better option.
There are some really great and cool tips that are provided below which will help you in getting the idea at which point to start and when you set the audio compressor ratio.
Consider these Audio Compressor Ratio Basics:
LOW RATIOS
Lower audio compressor ratios sound natural and transparent. They preserve the natural peaks as well as valleys of a signal along with working best in applying subtle compression. Although lower ratios always have less dynamic control.
MEDIUM RATIOS
Medium Compressor Ratios apply gentle dynamic control that holds on to the signal’s natural sound. You don’t notice any changes to the tone or punch as they provide tighter control over transient. Here you’ll notice the sound fuller and lower in comparison to others.
HEAVY RATIOS
In the heavier or say higher audio compressor ratios, you will notice a more processed as well as aggressive sound. In order to shape the extreme tone and dynamic control, heavy audio compressor ratios are used. But here I would like to give a little warning while using the higher ratios as they can cause a signal to lose the punch, clarity, and presence.
LIMITING
This infinite compressor ratio helps in preventing the signal from exceeding a digital ceiling. Due to this, the perceived loudness of a signal gets increased and the dynamic range gets reduced. Although using the limiter, there arises the problem of losing the detail and punch. Also, we see digital distortion and clipping when pushed hard.
NOTE
This is just a theoretical answer. There is also a mathematical equation in order to explain the audio compressor ratio in an easy way. But if you don’t want that way or if you are a person who doesn’t like math like me 😉 then lemme tell you. Trust your ears. They will tell you about what is wrong or right.
So let’s dive into the technical part of knowing about the compressor ratio with the formula and mathematical equation.
How to Set your COmpressor Ratio Knob like a Pro?
Okay, Since now you’ve understood about the compressor ratio, it’s time for us to move on to the practical session.
The first and the most important thing to realize here is that every control on the compressor works together. And due to this, adjusting them in tandem is the best option rather than just focusing on the ratio knob isolation.
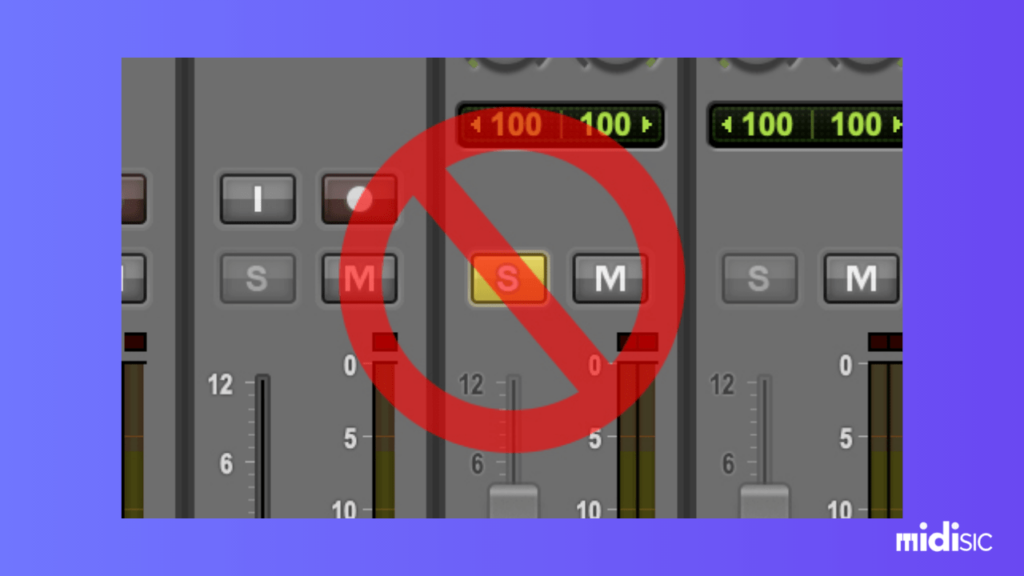
Remember when you tweak your audio compressor, just don’t solo the track that you are compressing. Instead of that, you should listen to the track in context with others in your mix playing.
Well, in the beginning, you will feel it a bit difficult as hearing your compressing won’t be that clear. But after listening to everything together, you will realize how beneficial your decision was and you’ll notice that your track fits with the other tracks on your mix.
Finding a static fader position for the track in a mix could be difficult as when compressing a track, the sounds are too dynamic. There is a huge difference in volume between the loudest and the quietest parts of the performance.
Let’s understand this with an example. Suppose you set the fader on a track at some point you felt it should be. The track might sound too loud when you hit the chorus. Now you’ll feel like turning the volume down. This will make your track sound too quiet.
Here comes the work of a Compressor. Compression he’s to even the things out on your track that was sound different previously. It helps tracks to sit consistently in the mix with just a single static fader position.
When you are playing with the audio compressor, make sure to keep this in your mind:
Think of using the audio compressor just as a tool to even out the different sections on the track without adjusting the fader. Obviously, there are other uses of the audio compressors, but keep this as your primary goal in the beginning.
Precedure to Set Compressor Ratio
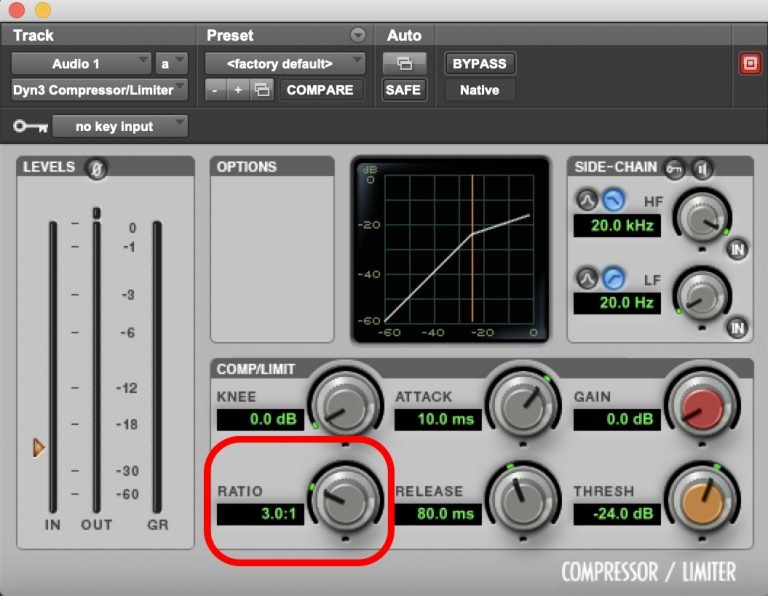
- Set up the compressor with medium attack as well as release time.
- The ratio setting must me medium – (3:1 might be a decent point to start).
- Until you hear the compressor start, lower the threshold.
- There must be a difference in the level when you flip the compressor in and out of bypass. Until that, keep on adjustinng the makeup gain.
- Also adjust the threshold, ratio, and makeup gain controls in tandem. This is to make sure that your track is sitting evenly and properly in your mix.
- If you are still hearing a big difference between the loudest and the quuietest part of the performnce, you need to bump up the ratio or turn the threshold down. When the compressor ratio is high, you get more processed and agressive sound.
- On the other side, if you feel that the compressor is kicking in, you would want the things to sound more natural. In order to do that, just lower the compressor ratio. But lowering the ratio will cause uncontrolled dynamics which can make it more difficult to find the static fader position for the track in your mix.
- Keep on adjusting the ratio, threshold, and makeup gain until you feel the track completely sits evenly in the mix. Make sure the track should not sound like slammed with compression (Unless and of course, if you want that effect purposly).
Compressor Ratio Formula

Output = (Input – Threshold) / Ratio + Threshold
This is the formula that is used for the calculation of compressor ratio.
How to calculate Compressor Ratio
The actual audio compression starts to happen once the audio passes over the threshold. After setting the ratio, the amount of compression will be determined.
Actually, it’s very difficult to remember every equation and the mathematical formulae in order to get the knowledge of how much compression is taking place. Let me give you a simple way to remember it.
Start with the lower ratios such as – 1.5:1, 2:1, 3:1. It allows more dynamics and applies less compression in the audio. Whereas the higher ratios such as 5:1, 8:1, 10:1 are the ones that allow fewer dynamics and more compression in the audio.
You can think of the dynamics as some sort of energy. For example, let’s take an example of lower ratio settings on a vocal. When you set the compressor ratio lower, it allows you to breathe a little and your voice does not squash or crack in between.
There is less gain reduction when the ratio is lower. Everything gets turned down and that results in the vocal to sound in a more natural way.
Compressor Ratio Math
If you did not understand yet what is an audio compressor ratio or how to calculate one, let me give you the answer in a more detailed way.
EX. 1
Let’s take an example of a compressor that has a threshold at -10dB and the ratio is 3:1(It’s the nice starting point for the vocals). Suppose you have a semi-constant level of the vocal at -1dB, It will reach only till -7dB as it’ll be automatically compressed.
Now let’s understand how we got the upper result and what is the correct method to calculate the compressor ratio.
After going over through the threshold, the vocal reaches its peak point, that is 9dB after -10dB, or at -1dB. Now, since the ratio is 3:1, we’re needed to take that 9 dB and divide them by three. After dividing it, we get the value 3dB.
Now that 3dB is to be added to the threshold at -10dB. At -7dB, the compression of 6dB reaches its peak.
Let me show you this mathematical solution with a simple formula:
The formula is in order to calculate the basics of the output of a compressor.
Output = (Input – Threshold) / Ratio + Threshold
Now put the values given above in the same formula. And after putting them respectively, you’ll get :
-7dB = -1dB – (-10dB) / 3:1 + (-10dB)
So you see now how it’s done. Also, the above example was for the lower ratio. But, if we have a higher ratio, in less signal output, we compress more signal ratio. Let’s take another example with a higher compression ratio.
EX. 2
Suppose we have a loud kick drum that has peaks at +4dB, but the threshold is at -20dB. Also, the ratio we have is 8:1. Although the compression amount given as an example is a lot, but yet, in order to serve as an example, it’s great.
Solution:
The dynamic range we have here is 24dBs, which is from -20dB to +4dB. If anything goes over -20dB by the ratio of 8:1, we are going to compress it.
Let’s again write the formula first:
Output = Input – Threshold / Ratio + Threshold
Now put the numbers given as an example in the formula.
-17dB = +4dB – (-20dB) / 8:1 + (-20dB)
Conclusion on What is Compressor Ratio
In the final showdown, I would just like to say that the most important thing in order to learn or understand something is to learn its instrument. That instrument could be anything. If you become a master in that, then you don’t need to learn the technique behind it.
In order to understand the compression ratio or compressor ratio, you are needed to understand the tools first. Also, remember one thing this compression is one of the most important topics in music production. So make sure you do it through well.
We’ve given you the mathematical equation/formulae that will help you best in getting the compressor ratio right. But if you are the one who doesn’t get a lot of formulae, or is not into maths, then I would recommend you one thing. Train your ears.
At the end of the day, everything that you make will be heard by many through ears. If you can understand the difference between a perfectly compressed voice and an uncompressed voice, then there is no such need for the formula or equation. So make sure you keep on practicing and listen to music as much as you can.
Till now, you have become familiar with the ins and outs of what is compressor ratio. The time has come for you to go back to your half-baked mix and finish it real quick with the perfect compressor ratio.
FAQ
In order to change the dynamics of the track, it becomes necessary to add compressors to each track. In order to prevent distortion, you are required to do the peak reductions of the vocals. And in order to lessen that work, you are required to record and mix the track at appropriate levels. Compressors give us the ease to control the dynamics of any track.
A ‘Voltage Controlled Amplifier’ is the best choice for keeping the check-in any loud spikes in volume on your track. Because this compressor has the tendency to offer the most aggressive gain reduction, it’s a good option for the same.
To reduce the volume, the VCA compressor uses an attenuator. So if we talk technically, it can’t be called an amplifier.
READ FULL BLOG: Types of Audio Compressor

 Over 250+ Pages of Mixing Guide